
TL;DR: Want a secure‑boot example you can run, break, and verify (not just read)? This kit gives you a clean baseline: A/B slot boot, watchdog rollback, anti‑rollback, key lifecycle, and deterministic pass/fail demos on host + QEMU.
Bare-metal secure boot you can actually run (and break) in 10 minutes
Secure boot on Cortex‑M is not a service. It’s a single decision point immediately after reset:
- ✅ verify the candidate firmware image (format + integrity + “auth” binding)
- ✅ decide run or refuse to run
- ✅ behave deterministically under failure (no “crash and hope”)
Most posts explain the idea. This one stays educational and gives you a runnable baseline you can reuse.
Get the kit
Buy on Gumroad: Secure Boot Kit
- Format: ZIP (code + docs + demos + tests)
- License: personal / internal use (no redistribution)
- Support: docs + community discussion
- Need commercial/shipping rights? See FAQ (“Licensing”) below.
Proof first: what you can see happening at boot
A real secure-boot flow should answer:
- What exactly is verified at boot?
- What happens if the image is modified?
- Does the system refuse to jump to application code on failure?
- Can I reproduce the failure path reliably?
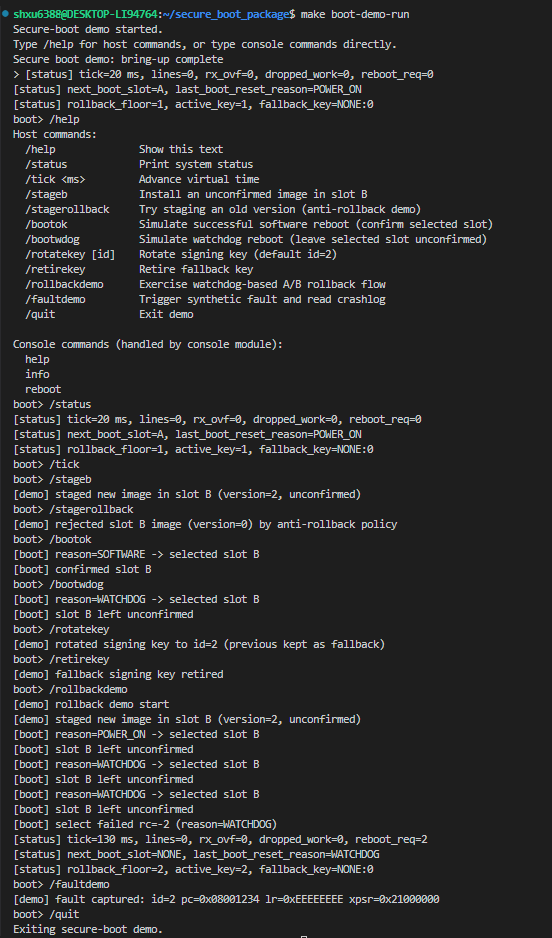
This kit demonstrates deterministic outcomes:
- A valid image boots normally
- A single-byte modification causes validation failure
- Control never jumps to the application on failure
- Retry/rollback behavior is observable and testable (A/B + watchdog policy)
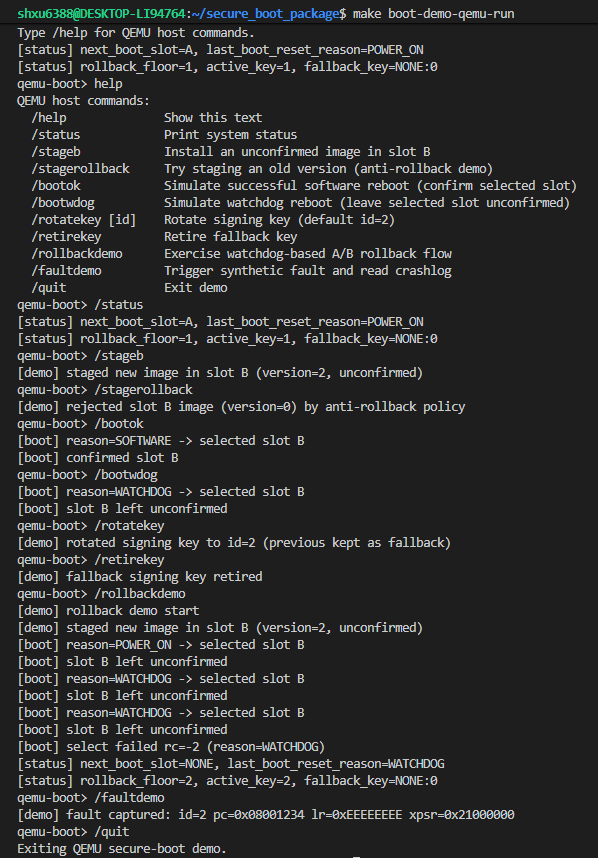
Example:
10-minute quickstart (no hardware required)
From the repository root:
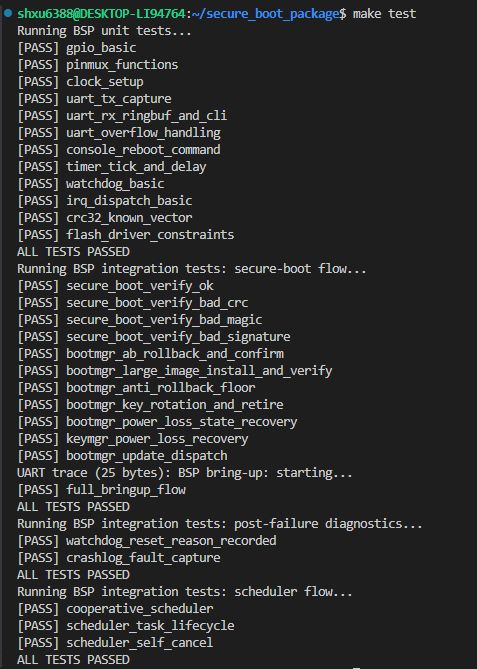
make test
make boot-demo-run
make boot-demo-qemu-run
What you’ll see:
make test→ unit + integration checks for policy behaviorsmake boot-demo-run→ interactive secure‑boot simulator on your hostmake boot-demo-qemu-run→ embedded-style build + boot path executed in QEMU
Secure boot fundamentals
If you’re a student: this section gives you the “why” and the mental model.
If you’re a professional: skim headings, then jump to the “Hands-on mini labs.”
1) What secure boot is (and isn’t)
Secure boot means: on reset, the device only runs firmware that passes the boot policy.
That policy typically checks:
- integrity: firmware bytes weren’t corrupted or modified
- authenticity: firmware came from an allowed signer (or allowed key)
- freshness: firmware isn’t an older vulnerable version (anti‑rollback)
- resilience: updates don’t brick the device (A/B + rollback)
Secure boot is not:
- encryption-at-rest (that’s a different control)
- a cloud service feature
- “security complete” by itself (debug ports, secrets handling, and runtime hardening still matter)
2) A minimal chain of trust on Cortex‑M
Bare-metal boot is simple, which is why it’s great for learning:
Reset
  ↓
Bootloader starts
  ↓
Select candidate slot (A/B policy)
  ↓
Validate image (header + integrity + auth + rollback policy)
  ├─ PASS → Jump to application ResetHandler
  └─ FAIL → Refuse to run (halt/safe-mode/diagnostic path)
The only thing that makes this “secure” is the explicit decision point before executing untrusted code.
3) Flash layout: where things live and why it matters
A realistic update-capable system typically has:
- Slot A: a complete bootable image
- Slot B: another complete bootable image (trial update target)
- Metadata pages: durable state (which slot, retry counters, rollback floor, key IDs)
- Crashlog page: last fault record to aid debugging
A simple layout (like this kit uses):
FLASH_BASE
  ├─ Slot A (96 KiB)
  ├─ Slot B (96 KiB)
  ├─ Boot state journal page 0
  ├─ Boot state journal page 1
  ├─ Key state journal page 0
  ├─ Key state journal page 1
  └─ Crashlog page (last erase block)
FLASH_END
Why journal pages? Power can die mid-write. Journaling (two pages + sequence) lets you recover the newest valid state.
4) Image format: you need metadata to be testable
A secure-boot image is more than “raw bytes.” You need a header so the bootloader can:
- sanity-check invariants (
magic, size bounds, alignment) - measure integrity (CRC or hash)
- bind authenticity (MAC/signature)
- enforce policy (version, key id, flags)
Typical fields:
magic(identifies image type)version(for anti‑rollback)image_sizeimage_crc(integrity)key_id(which key should verify this image)sig0/sig1(auth binding)
Key idea: you’re not just verifying bytes; you’re verifying meaning (metadata + payload are bound together).
5) CRC vs hash vs MAC vs signature (what each is good for)
Many beginners see “CRC” and assume it’s security. It isn’t. Here’s the clean mental model:
| Mechanism | Detects random corruption | Resists intentional tampering | Typical use |
|---|---|---|---|
| CRC32 | ✅ yes | ❌ no | flash corruption / transmission errors |
| Hash (SHA-256) | ✅ yes | ❌ no (no key) | measurement, integrity check when stored securely |
| MAC (HMAC) | ✅ yes | ✅ yes (keyed) | embedded authenticity with shared secret |
| Signature (ECDSA/Ed25519/RSA) | ✅ yes | ✅ yes (public-key) | authenticity with offline signing keys |
This kit uses:
- CRC32/ISO‑HDLC for payload integrity (fast, portable, incremental)
- a keyed signature/mixing model as a reference hook that binds metadata + payload to a 16‑byte key id
For production, many teams swap the “signature hook” for HMAC or a public-key scheme depending on threat model and key handling.
6) A/B updates + watchdog rollback (how devices avoid bricking)
A/B means: you never overwrite the only bootable image.
A common policy:
- Boot slot B as trial (unconfirmed)
- If the app reaches a “healthy” point, it marks itself confirmed
- If not (watchdog resets), decrement retry budget
- When retries exhausted → fall back to last confirmed slot (often A)
Why the watchdog is important:
- It’s the simplest way to detect “boot didn’t reach healthy”
- It forces an automatic rollback without user intervention
This kit lets you see the trial attempts being consumed and the fallback trigger.
7) Anti‑rollback: stopping downgrade attacks
Even if your image can’t be modified, an attacker might install an older signed image with known vulnerabilities.
Anti‑rollback is the rule:
Do not boot firmware versions below a persisted floor.
Practical designs store:
min_accepted_version(rollback floor) in durable metadata- update it only when a version is confirmed healthy
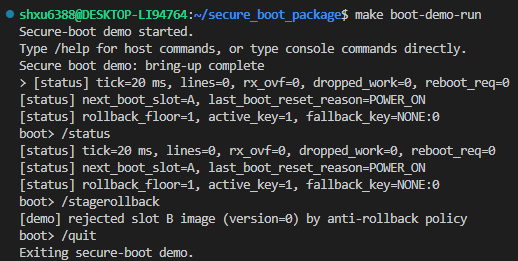
This is teachable and testable, and the kit includes a demo command that attempts to stage rollback_floor - 1 and shows it being rejected.
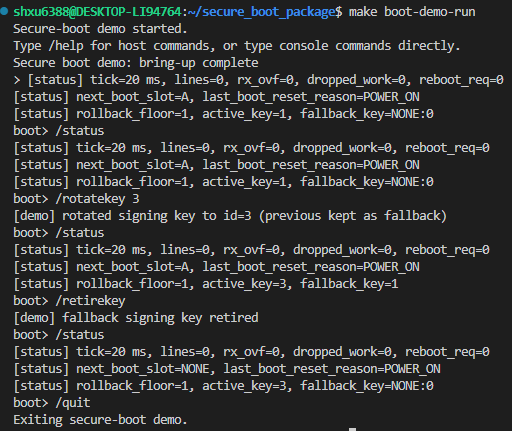
8) Key lifecycle: rotation and fallback windows
Real products rotate keys. Key rotation raises operational questions:
- How do you migrate from key 1 → key 2 without bricking devices?
- How long do you accept images signed by the previous key?
- When do you retire the fallback key?
A simple rotation model:
- Install a new active key id (new images use it)
- Keep the old active key as fallback during the migration window
- Once devices are migrated, retire fallback acceptance
This kit demonstrates rotation + retirement explicitly (not time-based), so you can learn the lifecycle clearly.
Hands-on mini labs
These are short guided sequences you can paste into a terminal for screenshots.
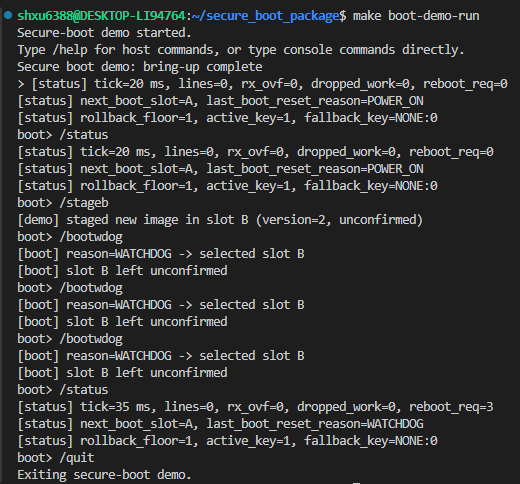
Lab A: Show A/B fallback with watchdog resets
Expected learning outcomes:
- how trial attempts get counted
- why fallback occurs after repeated watchdog resets
- what “confirmed” vs “unconfirmed” means in practice
Host demo
make boot-demo-run
/status
/stageb
/bootwdog
/bootwdog
/bootwdog
/status
/quit
demo output:
Lab B: Show anti‑rollback rejection
Expected learning outcomes:
- what rollback floor is
- why “signed but old” can still be rejected
make boot-demo-run
/status
/stagerollback
/quit
demo output:
Lab C: Key rotation + fallback-key retirement
Expected learning outcomes:
- key migration window vs retired key
- why explicit operational control is valuable
make boot-demo-run
/status
/rotatekey 3
/status
/retirekey
/status
/quit
demo output:
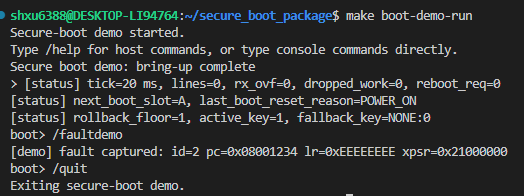
Lab D: Crash diagnostics (fault → persisted record)
Expected learning outcomes:
- why crash logs belong in flash
- what PC/LR/xPSR tell you about a fault
make boot-demo-run
/faultdemo
/quit
demo output:
Want the same “embedded artifact” feel? Run
make boot-demo-qemu-runand repeat the same commands at theqemu-boot>prompt.
The practical engineering part (how to jump to the app correctly)
A classic Cortex‑M mistake: “verification passes” but the jump to app is wrong.
A typical safe-ish jump sequence (pseudocode):
// 1) Read application vector table (first two words)
uint32_t app_msp  = *(uint32_t*)(APP_BASE + 0);
uint32_t app_reset= *(uint32_t*)(APP_BASE + 4);

// 2) Deinit / disable interrupts (platform-dependent)
__disable_irq();

// 3) Relocate vector table if your core supports VTOR (not on all M0/M0+)
SCB->VTOR = APP_BASE;

// 4) Set MSP and jump to ResetHandler
__set_MSP(app_msp);
((void (*)(void))app_reset)();
In production you also consider:
- clearing pending interrupts
- clock/peripheral state cleanup
- MPU/SAU configuration
- ensuring
APP_BASEalignment and address validity
This kit keeps the boot decision point clear and wires the embedded path end‑to‑end in the QEMU demo.
Introducing the Cortex‑M Bare‑Metal Secure Boot Kit
This kit is a small, readable secure‑boot baseline you can:
- run locally (host demo)
- run as embedded artifacts (QEMU demo)
- intentionally break (tamper) and observe refusal behavior
- extend into a hardened design for your own product
It’s not a black box. It’s the missing “runnable reference” between theory and production.
What you get (deliverables)
Boot policy + system behavior
- A/B slot selection with deterministic fallback
- Watchdog-driven retry accounting and rollback to last confirmed slot
- Anti‑rollback floor enforcement (reject old versions)
- Crash-log capture + readback for post‑mortem debugging
Image format + verification hooks
- Concrete image header:
magic,version,image_size,image_crc,key_id,sig0,sig1 - CRC32/ISO‑HDLC implementation details documented (portable, incremental)
- A keyed signature/mixing reference that binds metadata + payload to a 16‑byte key id
Note: The “signature” in this kit is a portable keyed construction designed for learning and portability. If you need public-key signatures (ECDSA/Ed25519) or HMAC, the code is structured so you can swap the verification primitive while keeping the A/B policy, metadata journals, and demos.
Power-loss-safe state
- Dual-page boot state journal + key state journal (sequence + CRC selection)
Runnable demos
- Host interactive demo: exercise policies without hardware
- QEMU demo: startup + linker + image header patching + policy on emulated Cortex‑M3
Tests + CI
- Unit + integration tests
- GitHub Actions CI matrix (Linux + Windows) to keep behaviors stable
Porting guidance
- Checklist for integrating on STM32 / NXP / ESP32-class targets (flash geometry, drivers, reset reasons, etc.)
Who this kit is for
- Students: you want a real secure‑boot baseline you can see working (and failing).
- Hobbyists / indie builders: you need a clean boot policy baseline for prototypes.
- Teams: you want a reference architecture you can harden, audit, and integrate.
What this kit is and is not
This kit is:
- a Cortex‑M bare‑metal secure‑boot reference
- readable, modifiable, and designed for learning + prototyping
- a policy-driven baseline (A/B, rollback, key lifecycle) with runnable demos
This kit is not:
- a turnkey certified secure‑boot product
- a full PKI, signing server, or vendor ROM replacement
- a “ship tomorrow” security guarantee without review and adaptation
Think of it as a production-oriented baseline you can validate quickly and then harden.
If you want to harden this for production (recommended next steps)
Depending on your threat model, consider:
- Replace the signature hook with:
- HMAC (shared secret) or
- ECDSA/Ed25519 (public key in device, private key offline)
- Protect key storage:
- vendor OTP/option bytes, TrustZone-M, secure element, or at least readout protection
- Lock debug appropriately (SWD/JTAG)
- Decide your update channel threat model:
- signed update packages, secure transport, server authentication
- Add version monotonicity that survives flash tampering:
- monotonic counters in OTP where available
- Threat model the “installer”:
- who is allowed to write slots? how do you authenticate updates?
FAQ
Do I need a dev board?
No. You can run the host demo and the QEMU demo locally.
Is this “real” secure boot or just a demo?
It’s a real boot policy baseline with deterministic behavior and runnable demos.
For a shipping product you still need to adapt it to your threat model, choose a cryptographic primitive appropriate for your requirements, and perform review/testing.
Does it use public-key signatures (ECDSA/Ed25519)?
The kit includes a portable keyed signature/mixing reference designed to keep the example runnable and easy to understand. The verification hook is intentionally structured so you can replace it with HMAC/ECDSA/Ed25519 while keeping the same boot policy and flash state model.
Can I use this in a commercial product?
The default license is personal/internal use (no redistribution).
If you want shipping/redistribution rights, add (or request) a Commercial License tier.
Suggested wording for Gumroad:
- Commercial License: shipping compiled firmware allowed; no source redistribution
- Enterprise License: custom terms / source escrow / support
What do I receive after purchase?
A ZIP package containing source, docs, demos (host + QEMU), tests, and CI configuration.
Get the kit
Buy on Gumroad: Secure Boot Kit
If you’ve ever wanted a secure‑boot example that goes beyond slides and actually refuses to run modified firmware, this kit gives you a clean, educational, practical starting point.